
In this article, I am going to describe about how to lazy load swiper slider by using lazy option.
I’m going to pursue the matter on the premise that you know how to make normal slider with Swiper.js. So if you are new to Swiper.js, firstly check the below article.
[Swiper] How to create a simple slider with swiper.js
Table of Contents
⓪Why lazy load by using swiper option
loading=”lazy” dose not work for Swiper slider.
lazyload.js work for Swiper slider but only outside the first view.
lazy option of swiper.js works for Swiper slider inside of first view as well.
So, you should use lazyload.js for the slider outside the first view, lazy option for the slider inside the first view.
Please refer below article if you want to know how to use lazyload.js.
tuupola/lazyload: Vanilla JavaScript plugin for lazyloading images
※The information of this article is at December 25, 2022.
①Create a normal swiper slider
To make it clear, we will create normal swiper slider first and then make changes.
<link rel="stylesheet" href="https://cdn.jsdelivr.net/npm/swiper@8/swiper-bundle.min.css">
<script src="https://cdn.jsdelivr.net/npm/swiper@8/swiper-bundle.min.js"></script>
<style>
.sample-slider{
width:70%;
}
.sample-slider img{
width: 100%;
}
</style>
<div class="swiper sample-slider">
<div class="swiper-wrapper">
<div class="swiper-slide">
<img src="./img/sample1.png">
</div>
<div class="swiper-slide">
<img src="./img/sample2.png">
</div>
<div class="swiper-slide">
<img src="./img/sample3.png">
</div>
</div>
<div class="swiper-pagination"></div>
<div class="swiper-button-prev"></div>
<div class="swiper-button-next"></div>
</div>
<script>
const swiper = new Swiper('.sample-slider', {
loop: true, //loop
pagination: { //pagination(dots)
el: '.swiper-pagination',
},
navigation: { //navigation(arrows)
nextEl: ".swiper-button-next",
prevEl: ".swiper-button-prev",
},
})
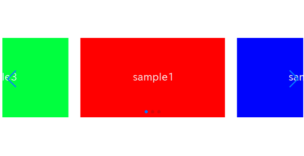
</script>Now we can see normal swiper slider.


②Add loading image
First of all, let’s add loading image.
Add <div class=”swiper-lazy-preloader”></div> to HTML as below.
<div class="swiper sample-slider">
    <div class="swiper-wrapper">
        <div class="swiper-slide">
            <img src="./img/sample1.png">
            <div class="swiper-lazy-preloader"></div>   <!-- added -->
        </div>
        <div class="swiper-slide">
            <img src="./img/sample2.png">
            <div class="swiper-lazy-preloader"></div>   <!-- added -->
        </div>
        <div class="swiper-slide">
            <img src="./img/sample3.png">
            <div class="swiper-lazy-preloader"></div>   <!-- added -->
        </div>
    </div>
    <div class="swiper-pagination"></div>
    <div class="swiper-button-prev"></div>
    <div class="swiper-button-next"></div>
</div>
Loading image has been added.
③Hide images
Hide images because we don’t want images to show at first time for lazy loading.
Modify data-src of img tag to src.
Add class=”swiper-lazy” as well.
<div class="swiper sample-slider">
    <div class="swiper-wrapper">
        <div class="swiper-slide">
            <!-- <img src="./img/sample1.png"> -->                  <!-- remove -->
            <img data-src="./img/sample1.png" class="swiper-lazy">  <!-- added -->
            <div class="swiper-lazy-preloader"></div>
        </div>
        <div class="swiper-slide">
            <!-- <img src="./img/sample2.png"> -->                  <!-- remove -->
            <img data-src="./img/sample2.png" class="swiper-lazy">  <!-- added -->
            <div class="swiper-lazy-preloader"></div>
        </div>
        <div class="swiper-slide">
            <!-- <img src="./img/sample3.png"> -->                  <!-- remove -->
            <img data-src="./img/sample3.png" class="swiper-lazy">  <!-- added -->
            <div class="swiper-lazy-preloader"></div>
        </div>
    </div>
    <div class="swiper-pagination"></div>
    <div class="swiper-button-prev"></div>
    <div class="swiper-button-next"></div>
</div>
Images has been hidden.
④Lazy load
It’s ready to lazyload, so next is execution.
Set lazy option true as below.
const swiper = new Swiper('.sample-slider', {
    lazy: true,         //added
    loop: true,
    pagination: {
        el: '.swiper-pagination',
    },
    navigation: {
        nextEl: ".swiper-button-next",
        prevEl: ".swiper-button-prev",
    },
})
If you move slide, you will see the images lazy loaded.
⑤Adjust the position of loading image
Now the loading image has been shown at near the top, so center it by adding CSS as below.
.sample-slider .swiper-wrapper{
display: flex;
align-items: center;
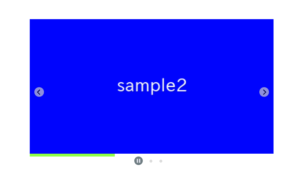
}Loading image is shown at middle. It is completed.
The full text of source code
In the end , I put the full text of source code.
<link rel="stylesheet" href="https://cdn.jsdelivr.net/npm/swiper@8/swiper-bundle.min.css">
<script src="https://cdn.jsdelivr.net/npm/swiper@8/swiper-bundle.min.js"></script>

<style>
    .sample-slider{
        width:70%;
    }
    .sample-slider .swiper-wrapper{
        display: flex;
        align-items: center;
    }
    .sample-slider img{
        width: 100%;
    }
</style>


<div class="swiper sample-slider">
    <div class="swiper-wrapper">
        <div class="swiper-slide">
            <img data-src="./img/sample1.png" class="swiper-lazy">
            <div class="swiper-lazy-preloader"></div>
        </div>
        <div class="swiper-slide">
            <img data-src="./img/sample2.png" class="swiper-lazy">
            <div class="swiper-lazy-preloader"></div>
        </div>
        <div class="swiper-slide">
            <img data-src="./img/sample3.png" class="swiper-lazy">
            <div class="swiper-lazy-preloader"></div>
        </div>
    </div>
    <div class="swiper-pagination"></div>
    <div class="swiper-button-prev"></div>
    <div class="swiper-button-next"></div>
</div>


<script>
    const swiper = new Swiper('.sample-slider', {
        lazy: true,                         //lazy load
        loop: true,                         //loop
        pagination: {                       //pagination(dots)
            el: '.swiper-pagination',
        },
        navigation: {                       //navigation(arrows)
            nextEl: ".swiper-button-next",
            prevEl: ".swiper-button-prev",
        },
    })
</script>
That is all, it was about how to lazy load swiper slider by using lazy option.
We believe those reading this article are likely hoping to improve the loading speed of the website.
The following article may be helpful because it discusses methods for reducing the loading cost of Swiper.js itself.
[Swiper] Reducing the loading cost of Swiper.js to zero
We also have been introduced various slider which can be made by swiper.js.
Swiper Demo 22 Slider


Awesome, thanks the explanation!