In this article, we will explain how to create a slider with thumbnails using swiper.js and React.
This will be achieved by utilizing the options of swiper.js to synchronize two sliders.
Table of Contents
①Create the main Swiper slider
npm i swiper@8
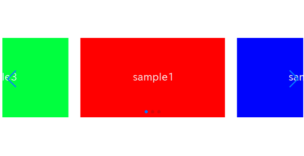
Let’s add navigation and looping only.
We’ll use the same images for the thumbnails, so we’ll keep them in an array.
import { Swiper, SwiperSlide } from 'swiper/react'
import { Navigation } from 'swiper'
import 'swiper/css/navigation'
import 'swiper/css'
import './style.css'

export default function SampleSlider() {
    const images = [
        '/img/sample1.png',
        '/img/sample2.png',
        '/img/sample3.png',
    ];
    return (
        <>
            <Swiper
                loop={true}
                modules={[Navigation]}
                navigation
            >
                {images.map((src, idx) => <SwiperSlide key={idx}><img src={src} /></SwiperSlide>)}
            </Swiper>
        </>
    )
}
.swiper {
width: 70%;
}
.swiper img {
width: 100%;
vertical-align: bottom;
}
Now main Swiper slider has been created.


②Make slider for thumbnail
This is a slider for thumbnails, so we don’t need arrows or dots.
Set the slidesPerView to the number of thumbnails you want to display.
<Swiper
    slidesPerView={3}
>
    {images.map((src, idx) => <SwiperSlide key={idx}><img src={src} /></SwiperSlide>)}
</Swiper>
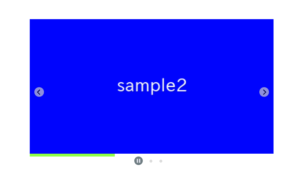
The appearance looks good, but the main slider and thumbnails are not yet synchronized.
③Synchronize the main slider and thumbnails
To synchronize the two sliders, you need to perform the following two steps.
- Use useState to maintain a reference to the thumbnails
- Establish the connection using the thumbs option
Use useState to maintain a reference to the thumbnails
import { useState } from 'react' // addedexport default function SampleSlider() {
const [thumbs, setThumbs] = useState(null) // added
.
.
.
}<Swiper
slidesPerView={3}
onSwiper={setThumbs} // added
>
{images.map((src, idx) => <SwiperSlide key={idx}><img src={src} /></SwiperSlide>)}
</Swiper>Establish the connection using the thumbs option
import { Navigation, Thumbs } from 'swiper' // modified<Swiper
loop={true}
modules={[Navigation, Thumbs]} // modified
thumbs={{swiper: thumbs && !thumbs.destroyed ? thumbs : null}} // added
navigation
>
{images.map((src, idx) => <SwiperSlide key={idx}><img src={src} /></SwiperSlide>)}
</Swiper>
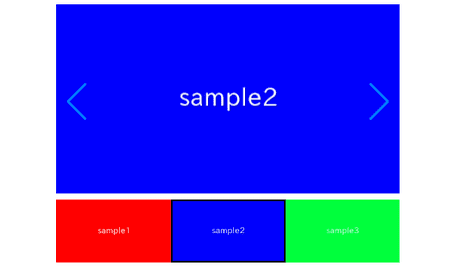
The main slider and thumbnails are now synchronized!
Clicking on a thumbnail should move the main slider.
④Add a border and hover style to the thumbnails
By using the thumbs option, automatic classes are applied to the thumbnails.
Let’s apply borders and hover styles using them.
.swiper-thumbs{
    cursor: pointer;
}
.swiper-slide-thumb-active{
    outline: 2px solid #000;
    outline-offset: -2px;
}
Now it looks good!
The full text of source code
In the end, I put the full text of source code.
npm i swiper@8 import { useState } from 'react'
import { Swiper, SwiperSlide } from 'swiper/react'
import { Navigation, Thumbs } from 'swiper'
import 'swiper/css/navigation'
import 'swiper/css'
import './style.css'
export default function SampleSlider() {
const [thumbs, setThumbs] = useState(null)
const images = [
'/img/sample1.png',
'/img/sample2.png',
'/img/sample3.png',
];
return (
<>
<Swiper
loop={true}
modules={[Navigation, Thumbs]}
thumbs={{swiper: thumbs && !thumbs.destroyed ? thumbs : null}}
navigation
>
{images.map((src, idx) => <SwiperSlide key={idx}><img src={src} /></SwiperSlide>)}
</Swiper>
<Swiper
slidesPerView={3}
onSwiper={setThumbs}
>
{images.map((src, idx) => <SwiperSlide key={idx}><img src={src} /></SwiperSlide>)}
</Swiper>
</>
)
}.swiper {
width: 70%;
}
.swiper img {
width: 100%;
vertical-align: bottom;
}
.swiper-thumbs{
cursor: pointer;
}
.swiper-slide-thumb-active{
outline: 2px solid #000;
outline-offset: -2px;
}
That is all, it was about how to create a slider with thumbnails using swiper.js and React.