In this article, we will explain about how to create file drag-and-drop functionality using only HTML and CSS.
Table of Contents
⓪Goal of this article
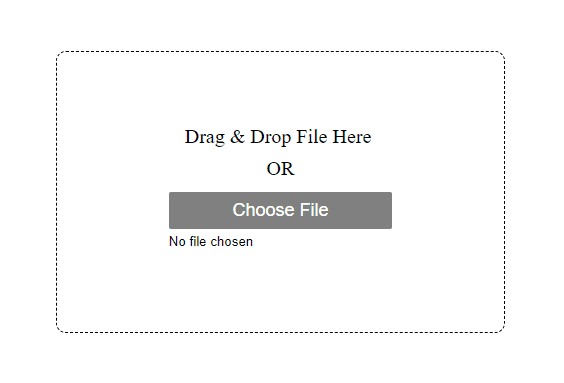
We aim to implement a file selection feature through drag-and-drop using only HTML and CSS, as outlined below.

①The input type=”file” allows for drag and drop
The first thing we should know is that the input type=”file” inherently comes with drag and drop functionality.

②Expand the input type=”file”
To expand the area for dropping, enlarge the input type=”file” to fill the frame.
Trying to do this with width and height would disrupt center alignment, so use padding instead (line 15).
<style>
    .drop-area {
        --drop-area-height: 300px;
        height: var(--drop-area-height);
        width: 80%;
        border: 1px dashed;
        border-radius: 10px;
        display: flex;
        justify-content: center;
        align-items: center;
        flex-direction: column;
    }
    .drop-area input[type="file"] {
        --button-width: 50%;
        padding: calc(var(--drop-area-height) / 2) calc( (100% - var(--button-width)) / 2 );
        width: 100%;
    }
</style>

<div class="drop-area">
    <input type="file">
</div>
You should be able to drag and drop anywhere within the border, so please give it a try.
③Change the button design of the input type=”file”
You can change the button design using the ::file-selector-button pseudo-element.
Here is a detailed explanation about the ::file-selector-button pseudo-element.
[CSS] How to Style input type=”file” button
.drop-area input[type="file"]::file-selector-button {
    width: 100%;
    display: block;
    border: none;
    color: white;
    background: gray;
    padding: 8px 10px;
    margin: 0 0 5px;
    border-radius: 2px;
    font-size: 18px;
}
④Add the phrase “Drag & Drop File Here”
.drop-area::before {
    content: "Drag & Drop File Here \A OR";
    white-space: pre;
    text-align: center;
    position: absolute;
    margin-top: -4em;
    font-size: 20px;
    line-height: 1.6;
}
The drag and drop functionality has been completed!
The full text of source code
In the end, we put the full text of source code.
<style>
    .drop-area {
        --drop-area-height: 300px;
        height: var(--drop-area-height);
        width: 80%;
        border: 1px dashed;
        border-radius: 10px;
        display: flex;
        justify-content: center;
        align-items: center;
        flex-direction: column;
    }
    .drop-area input[type="file"] {
        --button-width: 50%;
        padding: calc(var(--drop-area-height) / 2) calc( (100% - var(--button-width)) / 2 );
        width: 100%;
    }
    .drop-area input[type="file"]::file-selector-button {
        width: 100%;
        display: block;
        color: white;
        border: none;
        background: gray;
        padding: 8px 10px;
        margin: 0 0 5px;
        border-radius: 2px;
        font-size: 18px;
    }
    .drop-area::before {
        content: "Drag & Drop File Here \A OR";
        white-space: pre;
        text-align: center;
        position: absolute;
        margin-top: -4em;
        font-size: 20px;
        line-height: 1.6;
    }
</style>

<div class="drop-area">
    <input type="file">
</div>
That is all, it was about how to create file drag-and-drop functionality using only HTML and CSS!
If you want to add a “preview” function Javascript is required .
[Javascript] Drag & Drop with Image Preview
There are other things that can be achieved using only CSS, such as the following.