In this article, I am going to describe about how to create 3D cube slider using effect option of swiper.js.
I will also explain how to make detailed adjustments using cubeEffect.
I’m going to pursue the matter on the premise that you know how to make normal slider with Swiper.js. So if you are new to Swiper.js, firstly check the below article.
[Swiper] How to create a simple slider with swiper.js
Table of Contents
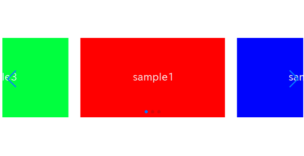
①Create a normal swiper slider
To make it clear, we will create normal swiper slider first and then make changes.
<link rel="stylesheet" href="https://cdn.jsdelivr.net/npm/swiper@8/swiper-bundle.min.css">
<script src="https://cdn.jsdelivr.net/npm/swiper@8/swiper-bundle.min.js"></script>

<style>
    .sample-slider{
        width:50%;
    }
    .sample-slider img{
        width: 100%;
    }
</style>

<div class="swiper sample-slider">
    <div class="swiper-wrapper">
        <div class="swiper-slide"><img src="img/sample1.png"></div>
        <div class="swiper-slide"><img src="img/sample2.png"></div>
        <div class="swiper-slide"><img src="img/sample3.png"></div>
        <div class="swiper-slide"><img src="img/sample4.png"></div>
    </div>
    <div class="swiper-pagination"></div>
    <div class="swiper-button-prev"></div>
    <div class="swiper-button-next"></div>
</div>

<script>
    const swiper = new Swiper('.sample-slider', {
        loop: true,                         //loop
        autoplay: {                         //autoplay
            delay: 2000,
        },
        pagination: {                       //pagination(dots)
            el: '.swiper-pagination',
        },
        navigation: {                       //navigation(arrows)
            nextEl: ".swiper-button-next",
            prevEl: ".swiper-button-prev",
        },
    })
</script>
Now we can see normal slider.


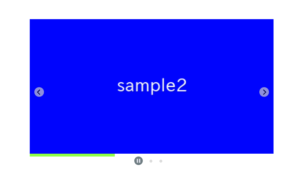
②Make the slider cube
Set effect option “cube” to make the slider cube.
Intidentally, lets set grabCursor option and speed option.
const swiper = new Swiper('.sample-slider', {
    loop: true,
    effect: "cube",                     //add(make slider cube
    grabCursor: true,                   //add(grab cursor
    speed: 1500,                        //add(slide speed
    autoplay: {
        delay: 2000,
    },
    pagination: {
        el: '.swiper-pagination',
    },
    navigation: {
        nextEl: ".swiper-button-next",
        prevEl: ".swiper-button-prev",
    },
})
The slider has become cube.
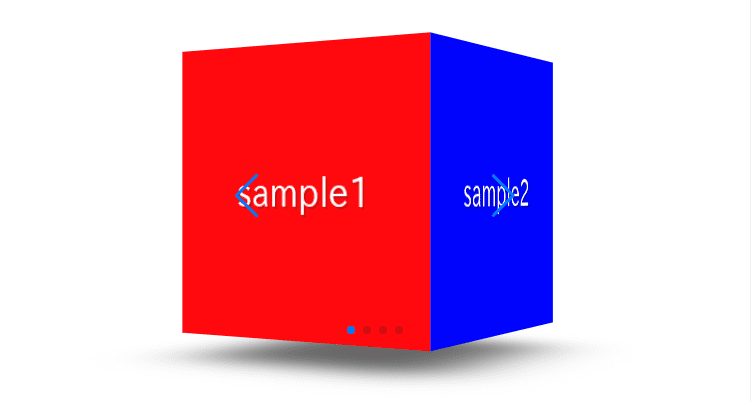
③Fine adjustments by the cubeEffect option
When specifying effect: “cube”, you can make fine adjustments using the cubeEffect option.
The available options that can be specified with cubeEffect are as follows:
| option | type | default | description |
|---|---|---|---|
| slideShadows | boolean | true | Presence of shadows on the slide surface |
| shadow | boolean | true | Presence of shadows below the slide |
| shadowOffset | number | 20 | Position of shadows below the slide (in pixels) |
| shadowScale | number | 0.94 | Size Ratio of shadows below the slide (0~1) |
Let’s take a look at an example using the cubeEffect option.
const swiper = new Swiper('.sample-slider', {
    loop: true,
    effect: "cube",
    cubeEffect: {                       // added
        slideShadows: true,             // added(Presence of shadows on the slide surface
        shadow: true,                   // added(Presence of shadows below the slide
        shadowOffset: 100,              // added(Position of shadows below the slide (in pixels)
        shadowScale: 1,                 // added(Size Ratio of shadows below the slide (0~1)
    },                                  // added
    grabCursor: true,
    speed: 1500,
    autoplay: {
        delay: 2000,
    },
    pagination: {
        el: '.swiper-pagination',
    },
    navigation: {
        nextEl: ".swiper-button-next",
        prevEl: ".swiper-button-prev",
    },
})
We are maximizing the size ratio of shadows below the slide and moving the shadow position further downwards.
The full text of source code
In the end,I put the full text of source code.
<link rel="stylesheet" href="https://cdn.jsdelivr.net/npm/swiper@8/swiper-bundle.min.css">
<script src="https://cdn.jsdelivr.net/npm/swiper@8/swiper-bundle.min.js"></script>

<style>
    .sample-slider{
        width:50%;
    }
    .sample-slider img{
        width: 100%;
    }
</style>


<div class="swiper sample-slider">
    <div class="swiper-wrapper">
        <div class="swiper-slide"><img src="./img/sample1.png"></div>
        <div class="swiper-slide"><img src="./img/sample2.png"></div>
        <div class="swiper-slide"><img src="./img/sample3.png"></div>
        <div class="swiper-slide"><img src="./img/sample4.png"></div>
    </div>
    <div class="swiper-pagination"></div>
    <div class="swiper-button-prev"></div>
    <div class="swiper-button-next"></div>
</div>


<script>
    const swiper = new Swiper('.sample-slider', {
        loop: true,                         //loop
        effect: "cube",                     //make slider cube
        cubeEffect: {
            slideShadows: true,             // Presence of shadows on the slide surface
            shadow: true,                   // Presence of shadows below the slide
            shadowOffset: 100,              // Position of shadows below the slide (in pixels)
            shadowScale: 1,                 // Size Ratio of shadows below the slide (0~1)
        },
        grabCursor: true,                   //grab cursor
        speed: 1500,                        //slide speed
        autoplay: {                         //auto play
            delay: 2000,
        },
        pagination: {                       //pagination(dots)
            el: '.swiper-pagination',
        },
        navigation: {                       //navigation(arrows)
            nextEl: ".swiper-button-next",
            prevEl: ".swiper-button-prev",
        },
    })
</script>
That is all, it is about how to create 3D cube slider with swiper.js.
There are the other sliders which can be made by effect option.
[Swiper]How to create card slider
[Swiper]How to create coverflow slider
[Swiper]How to create flip slider
[Swiper]How to create fade slider
[Swiper]How to create original slider using creativeEffect
If you are interested in how various slider can be made by swiper.js, please refer below article!
Swiper Demo 22 Slider